
How to Use Liquid Culture for Mushroom Growing
Liquid culture is one of the simplest ways to start growing gourmet mushrooms at home. Instead of waiting for spores to germinate, growers introduce actively growing mushroom mycelium directly into a prepared medium, such as sterilized grain, agar, or a sterilized grow bag.
For beginners, that can mean faster starts, fewer variables, and a more approachable path into mushroom cultivation. For small farms, liquid culture provides a repeatable way to inoculate batches of grain spawn while maintaining known varieties and predictable production records.
The key is understanding what liquid culture can do, what it cannot do, and how to protect it from contamination.
What Is Mushroom Liquid Culture?
Mushroom liquid culture is living mycelium suspended in a sterile, lightly nutritious liquid. The mycelium appears as floating strands, clouds, wisps, or small clusters inside the solution.
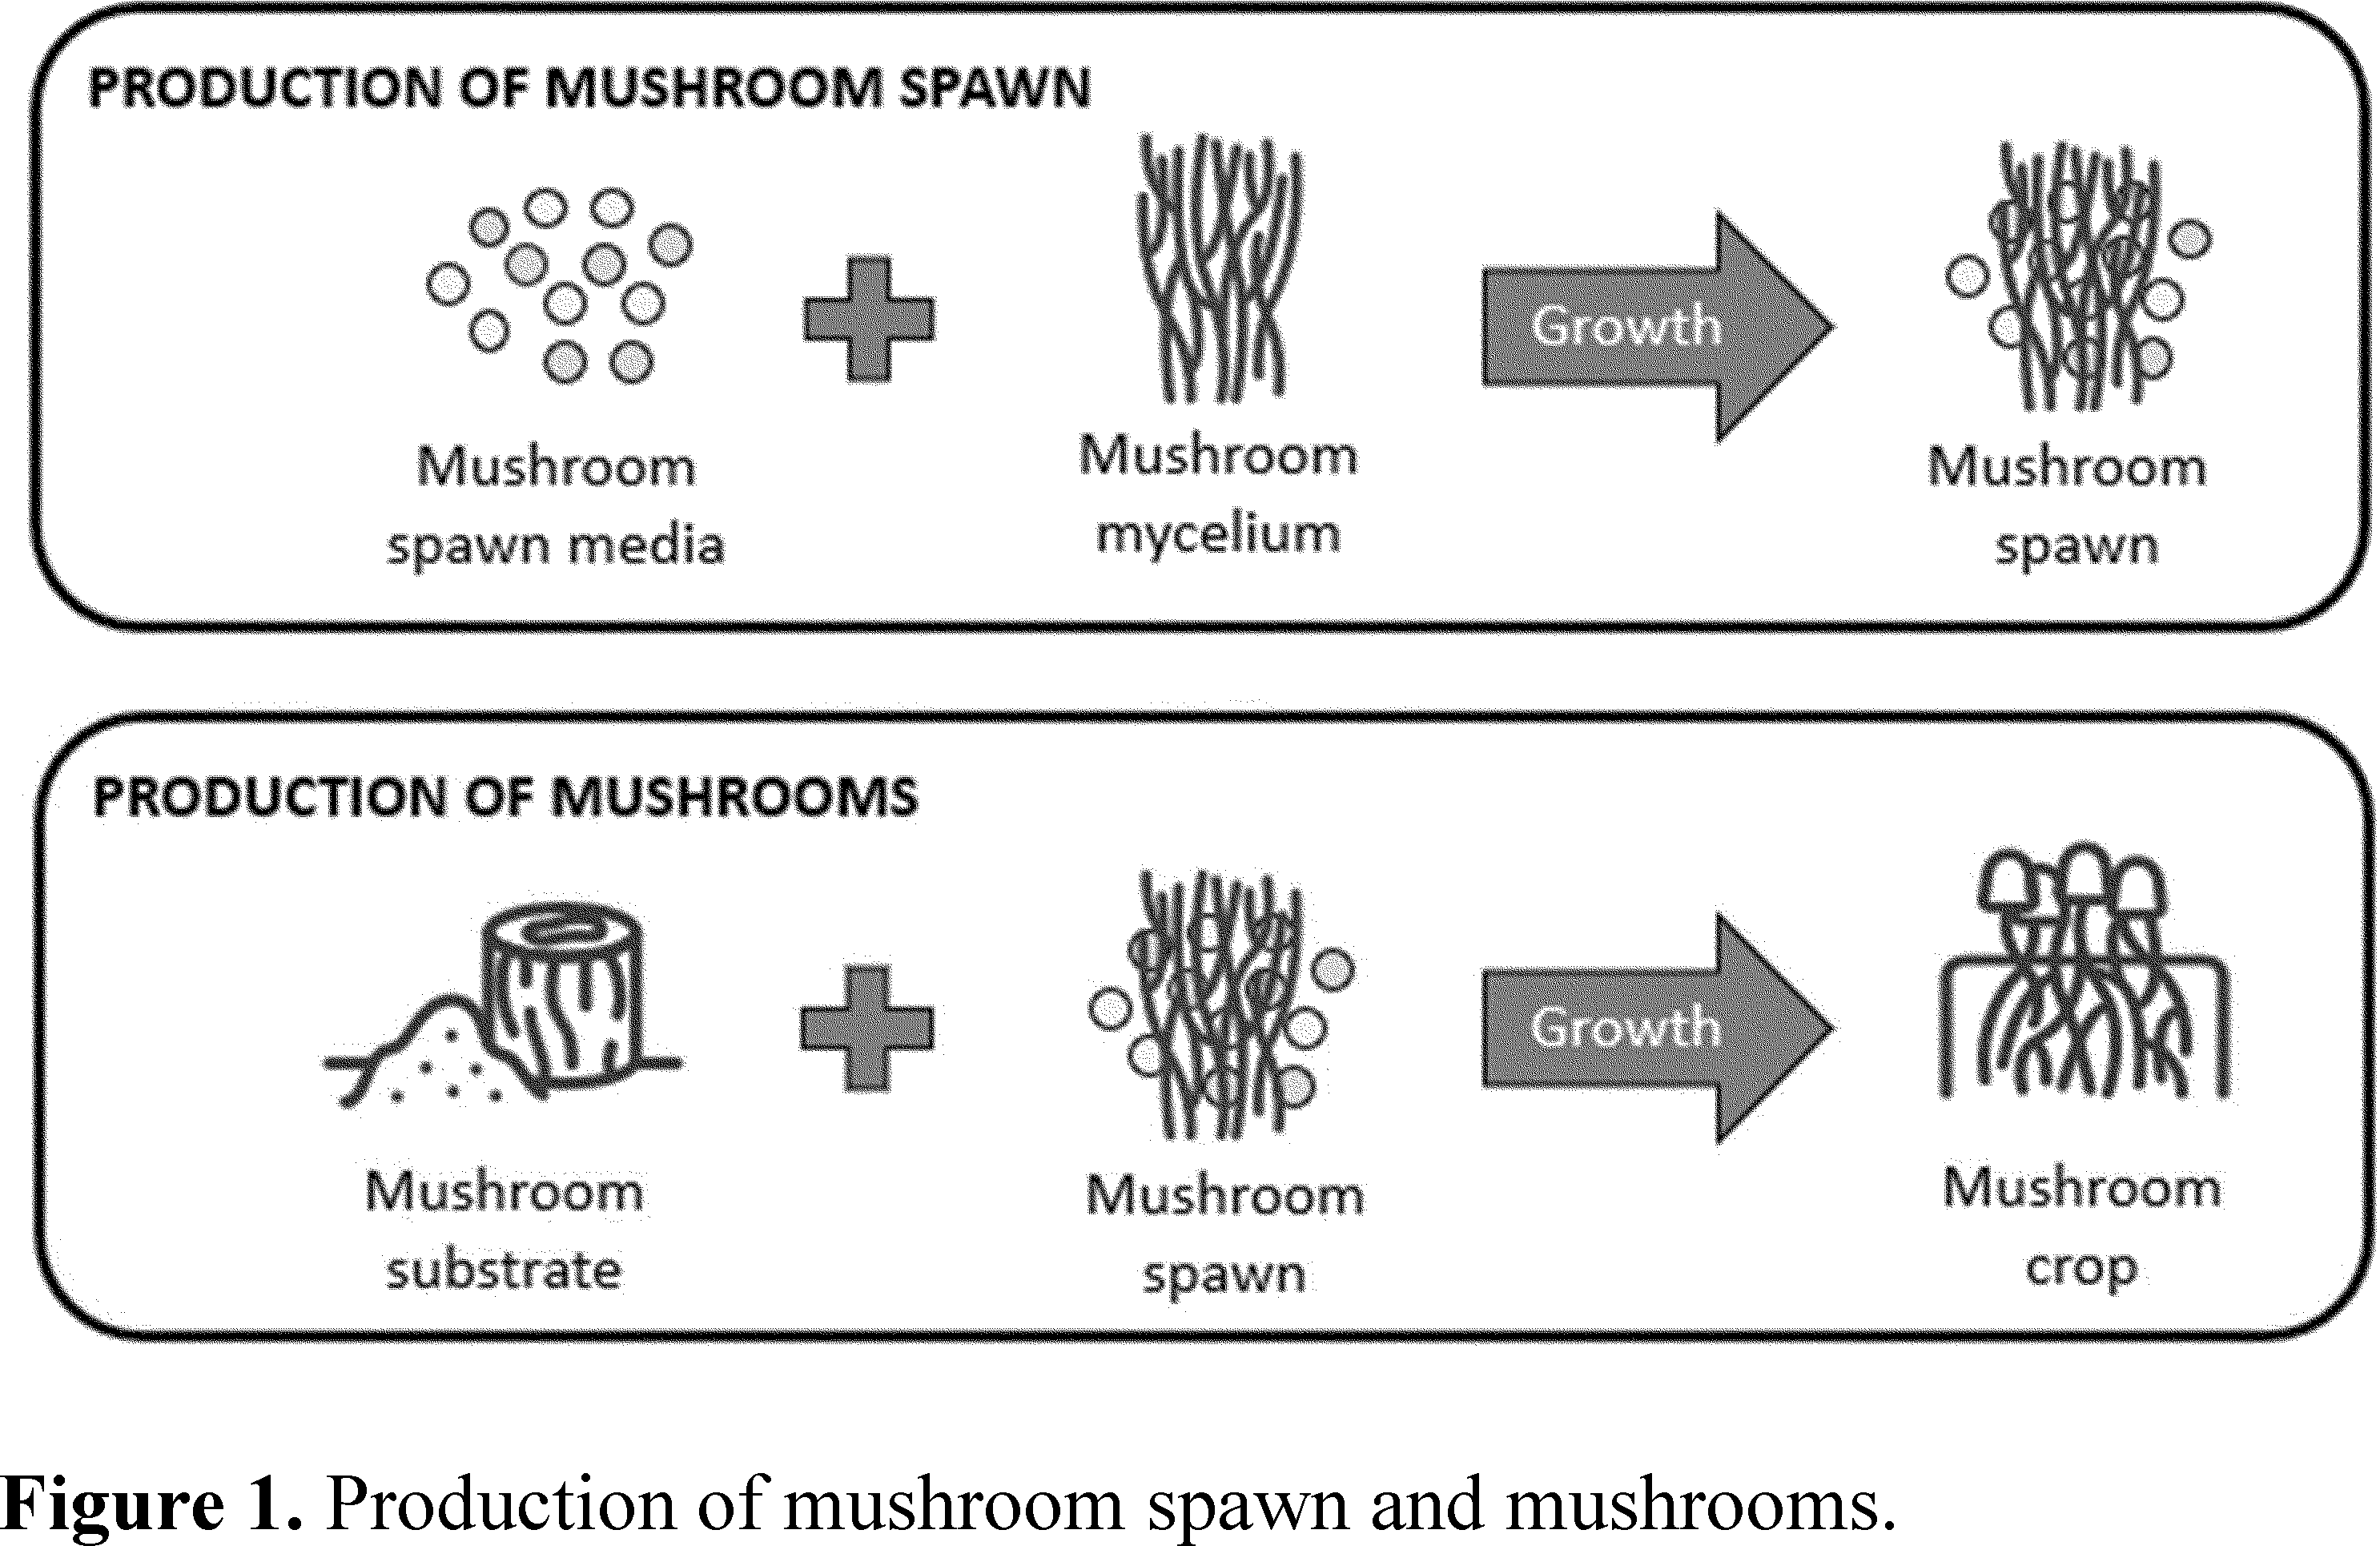
The USDA defines mushroom mycelium as a mass of branching, thread-like fungal structures called hyphae. It defines mushroom spawn as a material, such as grain or sawdust, that has been colonized by mycelium and can be used to inoculate a mushroom substrate.
- Liquid culture carries living mycelium in liquid
- Grain spawn carries mycelium on sterilized grain
- Sawdust spawn carries mycelium on sterilized sawdust
- Fruiting substrate provides the material from which mushrooms ultimately grow.
In most cultivation systems, liquid culture is used to create spawn. The colonized spawn is then used to inoculate the larger fruiting substrate.
Cornell Small Farms describes the same basic production sequence: mushroom cultures are expanded onto grain or sawdust to produce spawn, then the spawn is introduced into a substrate block that will eventually fruit mushrooms.
This means the standard workflow is:
Liquid culture → grain or sawdust spawn → fruiting substrate → mushrooms
Understanding that sequence prevents one of the most common beginner mistakes, which is injecting a small amount of liquid culture directly into a large amount of untreated bulk substrate.
Why Growers Use Liquid Culture
Liquid culture is popular because it combines convenience with established genetics.
A properly prepared culture already contains growing mycelium. It does not need to complete the same germination process as spores before beginning to colonize the new medium. This often gives the desired fungus a faster start.
Liquid cultivation is also used in scientific and commercial settings because it allows mycelium to be expanded and distributed through a liquid medium. Research has described liquid culture as a method for producing mycelial biomass efficiently and at scale, although growth rates and performance vary among species and strains.
For home growers and small farms, the practical advantages include:
- Easy inoculation through a self-healing injection port
- Even distribution across several areas of a grain bag
- Less handling than agar transfers
- Known species and strain characteristics
- Faster visible growth than many spore-based starts
- The ability to inoculate several containers with one syringe
- Convenient refrigerated storage between projects
Liquid Culture Versus a Spore Syringe
Liquid culture and spore syringes may look similar from the outside, but they contain biologically different starting materials.
A liquid culture contains established mycelium. A spore syringe contains reproductive spores that must germinate before a mycelial network can develop.
Starting with a clean, isolated culture generally provides greater predictability because the grower is working with an established fungal culture rather than a broad collection of germinating spores. Pure cultures are the foundation for preparing mushroom spawn, and the importance of maintaining healthy, uncontaminated cultures before transferring them to grain cannot be overemphasized.
Liquid culture is usually better when:
- You want a convenient starting method
- You want faster grain colonization
- You are growing a known commercial variety
- You do not want to perform agar isolation work
- You are inoculating bags or jars through injection ports
Spores may be useful when:
- You are developing or selecting new genetics
- You are performing microscopy
- You plan to germinate and isolate cultures on agar
- You are comfortable evaluating multiple genetic expressions
For most beginners who simply want to grow a known gourmet mushroom variety, liquid culture is usually the more direct option.
What Can You Inoculate With Liquid Culture?
Liquid culture should be introduced into a clean, nutritious medium that has been properly prepared for fungal growth.
Sterilized grain
Sterilized grain is the most common destination for liquid culture. Rye, millet, wheat, sorghum, oats, and corn can all be used as spawn media. Purdue Extension describes grain spawn as hydrated, sterilized grain inoculated with spores or a sterile mycelial culture.
Popcorn is particularly approachable for home growers because its large kernels are easy to inspect and break apart after colonization.
Growers who do not want to hydrate and sterilize their own grain can use a ready-to-inoculate grain spawn bag.
Sterilized sawdust
Liquid culture can also inoculate properly sterilized sawdust in containers designed for sterile injection. Sawdust is especially useful for wood-loving species such as:
- Lion’s Mane
- Shiitake
- Oyster mushrooms
- Reishi
- Turkey Tail
- Chestnut mushrooms
For many growers, however, it is more efficient to use liquid culture to create grain spawn first, then use the grain spawn to inoculate sawdust blocks. Grain provides numerous nutrient-rich inoculation points that can be mixed throughout a block.
Once established, the mycelium can also be expanded into hardwood sawdust spawn for logs, outdoor beds, wood chips, or additional wood-based substrates.
Agar
A small amount of liquid culture can be placed onto an agar plate to evaluate growth or confirm cleanliness before inoculating a larger batch.
Agar testing is especially valuable when:
- The culture has been stored for a long time
- The syringe was exposed to questionable conditions
- You are preparing an expensive batch
- You are expanding the culture into additional liquid
- You are creating farm-scale production records
Fungal cultures should be observed on agar for clean growth, and plates that show bacteria or unwanted fungi should be discarded. Transfers should be conducted under aseptic conditions in a still-air chamber or in front of a laminar-flow hood.
Presterilized grow bags
Some all-in-one bags and sterile substrate bags include self-healing injection ports. Liquid culture may be injected directly into these products when the manufacturer specifically designed them for syringe inoculation.
Follow the bag manufacturer’s recommended amount and procedure. Large bags can be slow to colonize when inoculated with too little culture, but adding excessive liquid can create wet areas that favor bacteria.
What Should Not Be Inoculated Directly?
Liquid culture should not normally be injected directly into untreated straw, unsterilized sawdust, open compost, garden soil, or other microbe-rich bulk materials.
The small quantity of mycelium in a syringe may not be able to establish itself before molds, bacteria, and competing fungi take advantage of the nutrient solution.
For most home and farm production, the safer sequence is:
- Inoculate sterile grain with liquid culture
- Allow the grain to become fully colonized
- Mix the colonized grain spawn into a properly pasteurized or sterilized fruiting substrate
This provides many more points of active mycelial growth throughout the final substrate.
Equipment Needed to Use a Liquid Culture Syringe
A basic inoculation does not require a complete laboratory. It does require sterile or properly sanitized materials and a workspace with limited air movement.
Essential supplies
- Liquid culture syringe
- Sterile needle
- Sterilized grain jar or grain bag
- Self-healing injection port
- 70% isopropyl alcohol
- Clean paper towels
- Disposable gloves
- Permanent marker or labels
- Still-air box or clean, draft-free workspace
Helpful upgrades
- Laminar-flow hood
- Pressure canner capable of proper sterilization
- Impulse sealer
- Sterile agar plates
- Alcohol lamp or torch
- Digital scale
- Laboratory tape or Parafilm
- Temperature-controlled incubation area
The Equipment and Supplies for Cultivation guide explains pressure sterilizers, still-air boxes, flow hoods, filter-patch bags, environmental controls, and other useful cultivation equipment.
How to Use a Liquid Culture Syringe
Step 1: Choose the correct culture and medium
Confirm the mushroom species on the syringe and verify that it is compatible with your intended substrate.
For example:
- Lion’s Mane, Shiitake, and Reishi prefer wood-based fruiting substrates
- Oyster mushrooms can grow on straw, hardwood sawdust, and many agricultural byproducts
- Wine Cap is commonly expanded for outdoor wood-chip beds
- Cordyceps militaris requires a specialized grain-based fruiting medium
The liquid culture does not change the nutritional needs of the species. It simply introduces the living fungus.
Step 2: Make sure the receiving medium is fully cooled
Never inject liquid culture into grain or substrate that is still warm from sterilization.
Heat can damage or kill the mycelium. Warm, sealed grain can also develop excessive condensation, which creates poor colonization conditions.
Allow jars or bags to return completely to room temperature before inoculating them. When in doubt, wait longer.
Step 3: Prepare the work area
Turn off fans, air conditioners, humidifiers, and anything else that moves air through the room. Close windows and keep pets away from the workspace.
Clean the work surface, wash your hands, put on gloves, and wipe the inside of your still-air box if using one. Spawn production is microbiological laboratory-style work, and sterile tools, disinfectant, and protected transfer conditions are essential.
Airborne contamination is a genuine concern in mushroom cultivation. Studies of commercial grow houses have found airborne Trichoderma capable of contaminating sawdust cultivation media.
Step 4: Redistribute the mycelium
Mycelium often settles or gathers into clusters while a syringe is stored.
Shake the syringe firmly to break the visible mycelium into smaller pieces and distribute it throughout the liquid. A sterile mixing bead inside the syringe may help break up dense clusters.
The solution does not need to look perfectly uniform, but you want visible mycelial material near the tip before injecting.
Step 5: Attach the sterile needle
Remove the capped syringe and needle from their packaging without touching the sterile connection points.
Twist the needle securely onto the Luer-lock fitting. Keep the cap on until you are ready to inoculate.
A new sterile needle is the safest option. When inoculating several containers with the same needle, sterilize it between containers or use a new sterile needle for each batch.
If you’re using flame sterilization, keep all alcohol containers and alcohol-wet materials away from the flame. Allow alcohol on gloves, ports, and work surfaces to dry before igniting a torch or alcohol lamp.
Note: If you’re using a still air box, alcohol vapors will be trapped in the still air box; they are extremely combustible. Use flame sterilization with caution; avoid it if possible.
Step 6: Clean the injection port
Wipe the self-healing injection port thoroughly with 70% isopropyl alcohol. Allow it to remain wet for the disinfectant’s appropriate contact period, then let the immediate area dry before bringing a flame nearby.
Do not wipe the needle with a nonsterile paper towel after flame sterilizing it. That would reintroduce contamination.
Step 7: Inject a conservative amount
Insert the needle through the self-healing port and inject the culture against the inside wall of the bag or jar when possible. This makes early growth easier to see.
More liquid is not always better. Excess liquid can make grain overly wet and create localized areas where bacterial contamination can flourish.
Use no more than approximately 1 mL of culture per half pound of grain as a conservative upper guideline. That is about 2 mL per pound. Actual needs vary with grain preparation, bag design, species, and culture vigor.
A practical starting range is:
| Grain amount | Conservative liquid culture range |
| 1-pound bag | 1 to 2 mL |
| 2-pound bag | 2 to 4 mL |
| 3-pound bag | 3 to 5 mL |
| Quart jar | About 1 mL |
These are starting ranges, not universal requirements. Properly hydrated grain and a vigorous culture may need less. Follow the instructions supplied with the grain bag or culture.
Step 8: Withdraw the needle and protect the container
Remove the needle cleanly and allow the injection port to reseal.
Do not cover a functioning self-healing port with unsterile tape. If the port was damaged or did not reseal, use clean laboratory tape designed for culture work.
Replace the needle cap only if you can do so safely without touching or puncturing yourself.
Step 9: Label everything
Write the following information on the bag or jar, or wherever you keep notes:
- Species
- Strain or variety
- Culture supplier
- Inoculation date
- Amount injected
- Batch or lot number
- Grain or substrate type
Batch records are not only for large farms; anyone can identify better methods by comparing colonization speed, contamination rate, and yield.
Step 10: Incubate under species-appropriate conditions
Place the inoculated container in a clean area within the preferred temperature range of the mushroom species.
Many gourmet mushroom cultures colonize grain well near ordinary room temperature. 72°F to 75°F works as a general grain-spawn incubation range, although individual species and strains differ.
Do not seal grain bags inside airtight totes. Filter patches need access to the surrounding air for gas exchange.
Direct sunlight is unnecessary and may overheat the bag. Ambient room light or a dim shelf is generally sufficient during grain colonization.
What to Expect After Inoculation
Visible growth may appear within several days, but some cultures take longer to recover from transport and adapt to the grain.
Healthy mycelium commonly begins as white growth spreading outward from the injection area or individual kernels. The exact appearance varies by species:
- Oyster mycelium often becomes thick and fast-growing
- Lion’s Mane can remain thin, wispy, and difficult to see
- Shiitake may colonize more slowly and later develop brown pigmentation on sawdust blocks
- Reishi may form dense, tough white mycelium
- Cordyceps can show delicate white growth before fruiting conditions are introduced
Complete grain colonization commonly takes approximately two to four weeks under suitable conditions, but species, temperature, inoculation rate, bag size, and grain moisture can significantly change that timeline.
Patience is important. Constantly handling, squeezing, and inspecting the bag can damage the filter or disturb the recovering mycelium.
Should You Break and Shake Grain Spawn?
Breaking and shaking redistributes colonized kernels throughout the uncolonized grain. This creates more growth points and can shorten the remaining spawn run.
A common approach is to break and shake once when approximately 20% to 40% of the grain has colonized. Utah State University suggests redistribution at roughly 30% to 40% colonization, while warning that excessive handling can damage mycelium.
Do not shake immediately after inoculation unless the product instructions recommend it. Allow the mycelium to establish visible growth first.
Some species recover better than others. Lion’s Mane can be more delicate than aggressive oyster cultures, so one careful redistribution is usually enough.
How to Test Liquid Culture on Agar
A culture can look clear and healthy while still carrying bacteria, yeast, or mold. Visual inspection of the syringe is useful, but it cannot prove sterility.
To test a culture:
- Prepare or purchase sterile agar plates
- Work inside a still-air box or in front of a flow hood
- Shake the syringe to distribute the mycelium
- Place one small drop near the center of the agar
- Close and seal the plate
- Incubate it at an appropriate temperature
- Observe growth without repeatedly opening the plate
Healthy mycelium should grow outward from the inoculation point in a pattern consistent with the species. Wet-looking bacterial growth, unexpected colors, unusual rings, or fast-growing mold indicate that the culture should not be used for a large batch.
Be sure to inspect culture plates for bacteria and unwanted fungi, and discard contaminated plates rather than using them for spawn production.
Agar testing is especially valuable for small farms because a single contaminated syringe can otherwise compromise many pounds of grain.
Signs of Contamination
Contamination does not always look the same, but common warning signs include:
- Green, black, blue, orange, or pink growth
- Slimy or greasy-looking kernels
- Excess liquid accumulating in the bottom of a bag
- Grain that appears wet but never colonizes
- Sour, fermented, rotten, or strongly sweet odors
- Rapid growth with a texture unlike the expected species
- Colonization that stops after initially progressing
- Grain that fails to recover after breaking and shaking
Green contamination is frequently associated with Trichoderma, although color alone should not be used for laboratory identification. Research on mushroom cultivation facilities has identified Trichoderma, Penicillium, Aspergillus, and other fungi as common contaminants.
Do not open a visibly contaminated bag inside your laboratory, home inoculation area, or fruiting room. Seal it, remove it from the growing area, and dispose of it according to your farm’s contamination procedure.
Trying to rescue contaminated grain is rarely worth risking the rest of your operation.
Common Liquid Culture Mistakes
Using too much culture
Excess liquid can throw off the grain’s moisture balance. A syringe may contain 10 mL, but that does not mean all 10 mL should go into one small bag.
Injecting warm grain
Even moderately warm grain can harm mycelium. Condensation can also make the grain wetter than intended.
Skipping sterile technique
Liquid culture provides living fungal material, not protection against bacteria or mold. A clean syringe can still produce a contaminated bag if the port, needle, grain, or workspace is dirty.
Working in moving air
Fans and air-conditioning systems keep airborne particles moving. A still-air box works because it reduces those currents.
Injecting directly into untreated substrate
Liquid culture works best when introduced into sterile spawn media or a specially prepared sterile kit. Untreated bulk substrate contains competing organisms.
Judging culture quality only by appearance
Visible white mycelium is encouraging, but it does not rule out invisible bacteria. Test valuable cultures on agar or a small grain jar before committing a large batch.
Handling the syringe carelessly
Touching the needle, placing it on the work surface, or wiping a sterile needle with a nonsterile material can contaminate the culture pathway.
Failing to label the batch
Without dates and strain information, you cannot compare performance or identify the source of recurring problems.
How to Store Liquid Culture Syringes
Keep liquid culture refrigerated unless the supplier provides different instructions.
Red Dirt Mushrooms recommends refrigerating its liquid culture syringes until use.
For best results:
- Store the syringe in a clean sealed bag or container
- Keep it away from the refrigerator door, where temperatures fluctuate
- Do not freeze it
- Keep the cap securely attached
- Label the storage date and species
- Avoid repeated warming and refrigeration
- Follow the supplier’s recommended use period
- Test older cultures on agar before inoculating a large batch
There is no single reliable shelf-life number for every liquid culture. Longevity depends on species, strain, nutrient concentration, initial cleanliness, storage temperature, and culture age.
A culture that has been stored longer may remain viable but recover more slowly.
Using Liquid Culture on a Small Farm
Small farms benefit from treating liquid culture as a tracked biological input rather than an anonymous syringe.
A simple quality-control workflow includes:
- Assign each culture a lot number
- Photograph the syringe when received
- Test a sample on agar or a small grain jar
- Inoculate one pilot bag before expanding the full batch
- Record colonization time and contamination rate
- Keep different culture lots physically separated
- Do not use the entire master culture at once
- Retain a clean backup culture when possible
- Track yield back to the original culture lot
- Remove questionable bags immediately
Cornell notes that culture and spawn work require skilled technique and a sterile space, particularly when farms produce their own blocks rather than purchasing them ready to fruit.
A farm producing weekly harvests should also separate its workflow into distinct zones:
- Culture and inoculation area
- Grain and substrate preparation area
- Incubation area
- Fruiting area
- Harvest and packing area
- Contamination quarantine area
Separating clean work from substrate handling and fruiting-room traffic helps reduce the chance that spores, dust, and pests reach vulnerable cultures.
Liquid Culture Frequently Asked Questions
How much liquid culture should I use?
A conservative starting guideline is approximately 1 mL per half pound of grain, with less often being sufficient when the culture is vigorous and the grain is properly prepared. Do not add extra liquid simply because the syringe contains more.
Can one 10 mL syringe inoculate several bags?
Yes. A 10 mL syringe can commonly inoculate several small grain bags or jars. The exact number depends on bag weight, hydration, culture quality, and the manufacturer’s recommended rate.
Do I need a laminar-flow hood?
Not necessarily. A properly constructed and sanitized still-air box can work well for home cultivation. A flow hood becomes more valuable as the number and value of your sterile transfers increase. That being said, it does make the work much easier and more reliable.
Can I inject liquid culture directly into a grow bag?
Yes, when the bag contains sterile grain or a presterilized substrate specifically designed for syringe inoculation. Do not assume that every bagged substrate is sterile or suitable for direct injection.
Can liquid culture inoculate pasteurized straw?
Directly injecting pasteurized straw is generally less reliable than first producing grain spawn. Grain spawn provides far more mycelial contact points throughout the straw.
Should I shake the syringe?
Yes. Like a Polaroid. Shake it firmly before use so the mycelium is distributed through the liquid rather than concentrated in one section.
Does cloudy liquid mean contamination?
Not always. Mycelium itself can make a solution appear cloudy or filled with wisps. However, appearance alone cannot establish cleanliness. Agar testing provides better evidence.
How long does colonization take?
Many grain bags show substantial growth within two to four weeks, but the range varies widely by species, strain, temperature, grain preparation, and inoculation rate.
Can I make more liquid culture from a syringe?
It is possible to expand liquid culture into a new sterile nutrient solution, but this is an advanced technique. Any unnoticed contaminant will also be expanded. Test the original culture on agar and use carefully controlled sterile procedures before attempting expansion.
Should I inject the entire syringe?
Usually not. Use only the amount needed for the container. Save the remainder refrigerated with the sterile cap attached, provided the syringe and connection were handled cleanly.
The Best Liquid Culture Workflow for Beginners
The most reliable beginner workflow is straightforward:
- Start with a reputable 10 mL liquid culture syringe
- Inoculate a sterile popcorn grain spawn bag
- Allow the grain to colonize fully
- Use that spawn to inoculate the appropriate fruiting substrate
- Incubate under the species’ preferred conditions
- Move the colonized substrate into fruiting conditions
- Harvest, record the result, and improve the next batch
Liquid culture removes some of the uncertainty from the beginning of the process, but successful cultivation still depends on clean technique, properly prepared grain, species-appropriate substrate, and a stable growing environment.